其實非常簡單,主要是藉由 Android 的 Webview 功能,就讓我們一步一步實作看看吧!
此處由範例直接開始教學,所以最好已經先有app的實作基礎喔!只要能夠印出「Hello World!」的大致上就沒問題啦! :D
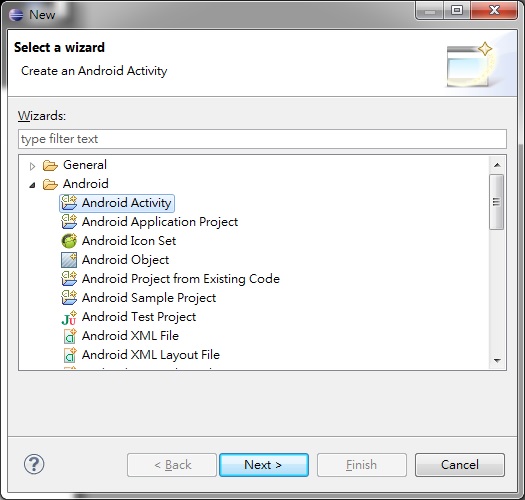
1、首先建立一個new 空白的 project,然後在 src 資料夾中按右鍵,點選「Other」。
選擇「Android\Android Activity」,下一步 Create Activity 的樣式。
Activity Name:Activity的名稱
Layout Name:Activity的layout檔名
按下「finish」後,會在src底下產生一個和Activitty Name相同名稱的檔案,以及在 layout和menu底下各產生一個webview.xml檔
2、/res/layout/webview.xml 的檔案程式碼如下:
This file contains bidirectional Unicode text that may be interpreted or compiled differently than what appears below. To review, open the file in an editor that reveals hidden Unicode characters.
Learn more about bidirectional Unicode characters
<?xml version="1.0" encoding="UTF-8"?> | |
<WebView xmlns:android="http://schemas.android.com/apk/res/android" | |
android:id="@+id/webview" | |
android:layout_width="fill_parent" | |
android:layout_height="fill_parent" | |
/> |
3、/src/com.webview/WebviewActivity.java
This file contains bidirectional Unicode text that may be interpreted or compiled differently than what appears below. To review, open the file in an editor that reveals hidden Unicode characters.
Learn more about bidirectional Unicode characters
package com.webview; | |
import android.os.Bundle; | |
import android.app.Activity; | |
import android.view.Menu; | |
import android.webkit.WebView; | |
public class WebviewActivity extends Activity { | |
@Override | |
protected void onCreate(Bundle savedInstanceState) { | |
super.onCreate(savedInstanceState); | |
setContentView(R.layout.webview); | |
WebView myWebView = (WebView) findViewById(R.id.webview); | |
myWebView.loadUrl("http://www.google.com"); | |
} | |
@Override | |
public boolean onCreateOptionsMenu(Menu menu) { | |
// Inflate the menu; this adds items to the action bar if it is present. | |
getMenuInflater().inflate(R.menu.webview, menu); | |
return true; | |
} | |
} |
結果畫面如下,是不是很簡單呢?
參考資料:
[1] http://developer.android.com/guide/webapps/webview.html
[2] http://developer.android.com/reference/android/webkit/WebView.html
沒有留言:
張貼留言